A Ropa Vieja that makes itself (or how I learned to love the crockpot)

One of the things my husband and my friends BEG me to cook is Ropa Vieja.  Seriously, it goes something like this:

“Where are you from?”

“I was born in PR my parents are Cuban”

“Seriously? So you can make Ropa Vieja

*sigh* of all the GREAT Cuban dishes, Ropa Vieja is at the top of the list.  I often wonder why, as I much rather have Tasajo or Lechón, but I tend to please my comensales and make Ropa Vieja.

Ropa Vieja is a dish that takes quite some work (similar to Tasajo), and I have an entirely different recipe for it when cooked the traditional way.  But some time ago Mami bought me a crockpot in the hopes that I would cook more with my limited amount of time (or some time late arrivals).  So as I set out to try my crockpot a friend told me that it was great for cooking the meat for the Ropa Vieja, and then I fount Marta.  And Marta has a recipe for Crockpot Ropa Vieja.  A recipe that *gasp* I. Tinkered. With. …to better suit my taste (and of course Alan’s) while still keeping as true as I could to traditional Cuban Ropa Vieja (not my family’s version).

So here is your list of ingredients:

  • 1.5 to 2lb of Flank Steak (I clean a bit of the fat off, but not all of it)
  • 1/2 green bell pepper sliced into strips
  • 1/2 whole medium to large yellow onion sliced into strips (halfwise)
  • 4 to 5 fat cloves of garlic smashed in a mortar
  • 2 tsp of Sea Salt
  • 2 tsp freshly ground coarse black peppercorns
  • 1/2 tsp of cumin powder
  • 1/2 cup of Cabernet Sauvignon red wine (preferably the same one you will use for dinner)

Depending on the side of your crockpot, you might have to do what I do and that is cut the meat in half across the grain like so:

Flank Steak cut in half

Next, mix all the dry ingredients – sea salt, cumin – as this will be your meat rub (Tip: for cold winters add the ground peppercorn to the rub as it will make the meat spicy, and the Ropa Vieja quite interesting!).  Make sure you rub it on both sides and across the cut.  You’ll have about half of it left to pour into the crockpot.  Set aside the Flank steak and the rub, while we prep the rest.  Slice the green bell peppers lengthwise; cut the onion in half and then slice thinly (or slice thinly and then cut in half).  It should look like this:

Onions, Peppers and Garlic …Oh My!

Mash the garlic up nicely on a mortero or if you prefer you can mince it.  I just really like using the mortero…it is kind of therapeutic.  Ok so once you have the garlic, the onions and the peppers ready here is what you do.  Layer some of the trio on the crockpot, add one half of the meat.  Add some more of the trio, add the other half of the meat.  Finish adding what’s left of the trio.  This ensures the meat gathers all the garlic, onion and pepper taste.

Bottom of Crockpot

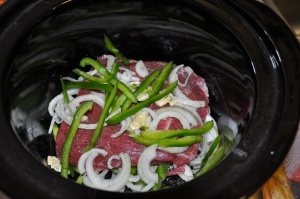
After you layer the meat and the rest of the garlic, onion and peppers it should look like this:

Crockpot with Flank Steak and garlic, onion and peppers

Once everything is in it is time to add the 1/2 cup of the wine, the rest of the rub and the water (to cover the meat BUT AFTER the wine).  I use Root Cabernet Sauvignon.  It’s not cheap but its not expensive (around $10) and its also the same one we drink with dinner so it matches perfectly!  Add the wine first, around the meat and softly on the meat so as not to wash the rub off.  Then add water – just enough to JUST cover the meat – and then add the rest of the rub to the liquid and blend softly.

Ready, Set and Forget it!

Set it in low for about 6 hours.  Check the meat with a fork @ 6 hours.  Usually it’s almost ready by then; if the meat separates easily then it’s time to take it out.  For the last half hour or so I just set the crockpot in warm so the meat is not over cooked.

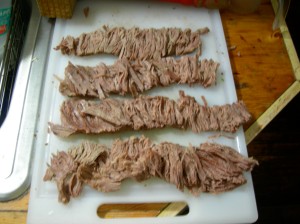
Once done take the meat out with a slotted spoon and lay in the cutting board to cool off a bit.  While it cools, with the same slotted spoon, remove the onion, garlic and peppers, and place in a bowl.  You will need 1 – 2 cups of the beef broth so set that aside as well.  Separate the meat with a fork and your hands until is is in strands.  Be careful as it is very hot.

Shredded Meat, Beef Broth, and Trio

So what next?  Now comes the good part!  You will need the following:

  • the 2 cups of broth you removed from the crockpot
  • the onions, peppers and garlic you removed from the crockpot
  • 1 small can of unsalted tomato sauce
  • 1 small can of tomato paste
  • 1-2 tbsp of Extra Virgin Olive Oil
  • 1 tsp of oregano
  • 1/4 of a green bell pepper cut into strips
  • 1/2 yellow onion cut in strips
  • 2 fat garlic cloves
  • Salt and pepper to taste

On a deep pan, heat the olive oil over medium heat and prepare a small sofrito with the 1/2 onion, 1/4 pepper and 2 garlic cloves.  Sautee for about a minute and add the onion, garlic and peppers you removed from the crockpot and sofreir another minute.  Add the meat, and stir with a fork so the sofrito and the meat blend well together.  Add half of the tomato sauce and 1 cup of the beef broth, cover and wait until it comes to a boil.  Take the lid of, and stir.  Add half of the tomato paste can and stir well, making sure it blends.  Cover and simmer in low for about 10 minutes.  Save the other cup of broth, with the leftover tomato sauce and paste for your leftovers – you will need them to heat the meat back up so it is not dry.

Ropa Vieja almost done!

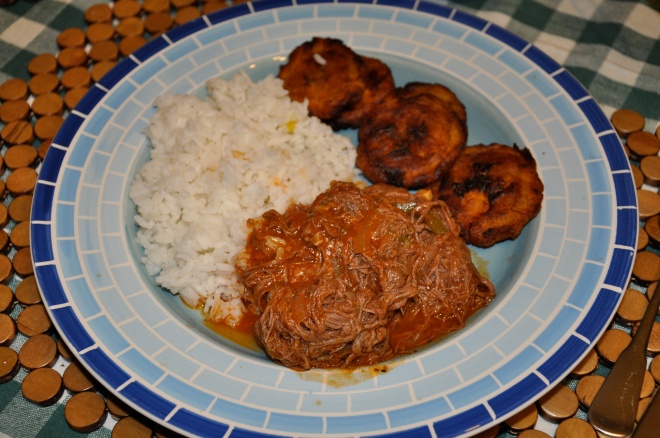
Now that you’ve labored soooooo hard over this, comes the simple part.  Serve with white rice, chatinos (a whole other post) and ENJOY!

Buen Provecho!

Cooking in Barcelona

Shame on me for not writing in sooooo long.  I don’t blame you if you don’t come around anymore or have taken me off your blogroll.  However, try teaching a class, finishing a dissertation and packing a move so you can understand how time limited we are.  Still no excuse, I should make time because this is after all my lifeline and my decompress time.

I sometimes wonder when I post my recipes if anyone tries them afterwards; no one ever tells me if they did or not, or if the recipe came out right or wrong.  When I started this blog it was more about me being able to write about our life and our recipes, but I wasn’t sure who would read it.  Turns out that even my school friend Sonia, who at the time was living in Barcelona, enjoys not only reading my recipes but also cooking them!

Sonia cooking up Moros con Cristianos

Sonia cooking up Moros con Cristianos

The best part is that she is enjoying the cooking!  See how she is all smiles preparing those Moros!

The finished product!

The finished product!

Nice piping hot Moros con Cristianos, my moros con cristianos and in Barcelona no less!  From what she told me they were a huge success among her friends!  Thanks Sonia for reading the blog, trying the recipe and sending me the pictures!

Fried Cow

Yes, friends, Vaca Frita.  I held off on posting this during Lent because I couldn’t guarantee it wouldn’t fall on a Friday, and since Catholics are not supposed to eat meat on Fridays, I didn’t want to torture any of my readers.  Seriously, Vaca Frita on a Lenten Friday, that could be cruel and unusual punishment!  Afterwards I got caught up in my dissertation and before I knew it a week went by and no posts on my part!  Yikes! :-0

No one ever made Vaca Frita in my household, though we did eat a lot of Ropa Vieja (recipe to come soon!).  Believe it or not my first encounter with vaca frita was watching the Frugal Gourmet (remember him?  I think I just dated myself) while in college and he was making vaca frita.  How cool is that? The Frugal Gourmet showcasing Cuban food in 1992!  Ever since then I started tinkering with different recipes, and trying vaca frita at different restaurants.

Who serves the best vaca frita in Miami? From 2000-2004 I can tell you that Lario’s by Mall of the Americas was by far the BEST vaca frita in Miami (they also had the best congrí oriental but that’s an entirely different post), followed closely by Havana Harry’s and Havana Miami.  Most of the other places I tried the dish, it was either too greasy, too shredded or not enough lemon and garlic.  See there are two ways of serving vaca frita – the steak form and the shredded form.  I’ll eat both, but I overwhelmingly prefer the former: steak form.  And of course, wouldn’t you know it, es la más difícil de hacer de las dos!

Here is what you will need:

  • Flank Steak – about a 1.5lb for 4 people.
  • Sliced medium onion
  • 8 fat garlic cloves – smashed en el pilón
  • 4 green lemons (or in proper English limes) juiced
  • 2 tbs extra virgin olive oil
  • salt, pepper and cumin to taste

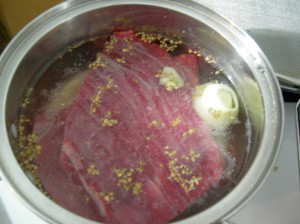
You might be tempted to boil the meat in a crockpot; however, for bistec style vaca frita this is not recommended because the vaca frita will shred into ropa vieja, in Spanish se va a desmoronar.  However if this is how you like vaca frita more power to you.  But this is my bistec de vaca frita recipe, so no crockpot!  Start by soft boiling, in very low heat (simmer), the flank steak.  Usually I season with some onion, salt, a bit of cumin and some bay leaves.

Flank Steak ready to simmer

Flank Steak ready to simmer

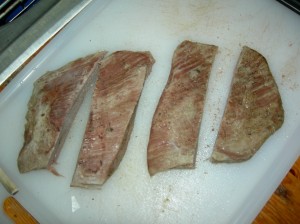
Watch while it boils, so you can take it out at the right time.  The idea is to have it close to medium; if you overcook it the meat will harden and get a bit gummy.  Not a major problem, you’ll just have to masonearla to get it to shred!  But first you should cut the steak into the four portions.  You want to make sure you cut across or against the grain, so that you can shred it.

Cut into four steaks

Cut into four steaks

In any case I do use a masón, and open the steak for easier shredding.  However, I wait for it to cool. Don’t hit it too hard; you want to separate it enough so that you can shred by hand but still manage to keep it all together.  Confused?  Don’t be.  See?  It’s not that hard!

Semi Shredded Steaks

Semi Shredded Steaks

Be very careful when you shred the steaks.  The idea is to separate it but keep it together at the same time.  However, this separation will allow for the marinade to get through.  Don’t marinate too long either; about an hour.  For the marinade there are various things you can do.  What I do is take a lemon per steak (limon criollo so in English that would be a lime).  Squeeze all the juice out. OJO: If you don’t like it too lemony then just use two lemons.  Add a bit of olive oil.  Take the garlic cloves and mash them in a pilón.  Find a deep dish to put the steaks in; even better if it has a lid.  I use a square pyrex with lid.  Add some salt to the lemon oil mixture, and then add all of it to the garlic in the pilón.  Yes, its almost like making mojo.  Pour it over the steaks, cover and shake shake shake señora!  Let it sit for at least an hour.

Now it is time to add the FRITA in Vaca Frita.  In other words it is time to fry those steaks!  Slice the onions and then cut them in half, so they are half moons.  Heat up the olive oil in a skillet in medium heat.  You want it hot enough to fry the steak and not allow any juices to start boiling.  When the oil is hot enough, fork the steaks out and put on the skillet.  Add the sliced onions.

Frying the Vaca Frita!

Frying the Vaca Frita!

Here you need to velar la vaca frita, so it doesn’t burn and more importantly, so the garlic doesn’t burn.  And you’ll have to turn it at least twice.  When the strings start getting brownish and toasty, then you are almost there.  At that time, whatever was left in the pyrex (the lemon garlic mixture) throw it in!  You want the Vaca Frita to be sort of crispy crunchy on the outside, but inside you want it to be like traditional ropa vieja – meaning soft and moist.  That’s el truco de la vaca frita!  When you are done, serve with white rice and black beans.

Vaca Frita, white rice and black beans!

Vaca Frita, white rice and black beans!

Like I said before, it’s up to you to manage the amount of lemon and garlic you want according to your liking.  Personally I like it really REALLY garlicky, which is why I loved the Lario’s vaca frita.  I like some cumin, a bit of salt and a pinch of pepper.  But those you can manage to taste.  The trick here again, is the crunchy in the outside, moist in the inside.

Enjoy!

¡Tostadas!

There is nothing I miss most living in Rhode Island than being able to have tostadas y café con leche for breakfast.  Now, I have café con leche every morning; that is not problem.  But tostadas?  I can’t even get anything similar to Cuban bread for those.

But, Dios ayuda a los pobres, and I have good friends (Thanks Vivi!!!!).  Yesterday I received a package with Mallorcas and YES, pan de agua aka Cuban bread.  It might’ve not been the best bread ever, but when you’ve been as deprived as we have, trust me.  It. Is. The. Best. Bread.

So for those of you clueless on how to make great Cuban tostadas, it is quite easy.  So here we go!  The most MOST important ingredient for making Cuban tostadas, is a plancha.  You have to have one of these:

La Sanwichera! aka Grill

La Sanwichera! aka Grill

Of course the first thing you need is a libra de pan.

Pan de Agua from Pepín

Pan de Agua from Pepín

After you’ve cut the bread into the size toast you want (for example the picture depicts three tostadas), then halve it so we but butter inside.

Pan with butter

Pan with butter

Next key ingredient is softened butter.  NO, not margarine.  Aside from how unhealthy it is butter tastes sooooo much better.  So be sure to butter both sides of the toast.  Once we are ready, we heat up the grill machine, and I personally butter both sides of the planchas.  It gives the tostadas a nice color and an even better taste.  Once the grill is hot enough (I use the medium setting)  carefully place the tostadas inside, and let the lid fall with its own weight on the tostadas.  Be careful and make sure the tostadas stay parallel to the plancha.

In the beginning.....

In the beginning.....

Every once in a while apply a bit of pressure by attempting to close the grill.  After about 5-7 minutes, turn the tostadas over.  Leave them on another 5-7 minutes while again applying some pressure on the lid.  Lastly, flip the tostadas over.  This means that although your are turning them on their side, you are also turning them back.  For example if you had an end, with the end pointing towards you, now on this last flip the end should be pointing away from you.  This will finish off the flattening part of the tostadas.

Last leg of Tostadas....

Last leg of Tostadas....

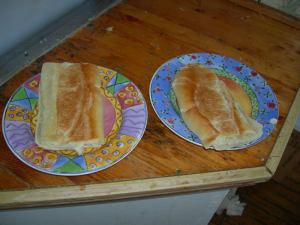
See?  You can almost close the grill!  Now, just another 5 minutes and then they are ready to be served.  Accompany with a nice hot and foamy café con leche and you have a Cuban breakfast!

Cuban Tostadas!

Cuban Tostadas!

Enjoy!!!!!

I get Cravings…

No I’m not pregnant, YET.  But every once in a while, the Cuban blood in my veins thumps around for something in particular.  Something that I’ve not had in a while.  Today it was Pan con Bistec. In Miami I would go to the Sergio’s in Bird Road, the one across the Bird Bowl.  Man, those guys made a mean Pan con Bistec.  It was the ONLY place where I did not have to specify the no mayonnaise clause.  It was really heavenly!  So here I am in March, in a small rural town in Rhode Island with a Pan con Bistec craving.

But what am I to do?  No Cuban bread; not even French bread.  Ahhhhhh but there is always a way to curb a Cuban girl’s cravings!  El Cubano siempre resuelve! So, if you are in my situation (and even if you have access to Cuban bread) here is what you will need to enjoy a delicioso Pan con Bistec:

  • Beef round sandwich steak (cubed or uncubed)
  • Salt, pepper, garlic powder and onion powder
  • Thinly sliced onions
  • Loaf of Italian, French or Cuban bread (in this case it was Italian)
  • Lettuce leaves
  • Sliced tomatoes
  • French fries – you know, the kind that come in the can (don’t worry you’ll see the pictures)

So with my trusty camera guy (ie. Alan my loyal husband) here we go!

Sliced onions in half

Sliced onions in half

Heat a tablespoon of Corn Oil in a non-stick skillet.  While the oil heats up, slice the onions and then cut the slices in half.  Make sure, and this is very important, that the slices are as THIN as you can make them out to be.

Season your Bistecs, with salt, pepper, garlic and onion powder to taste.  Try not to overkill but enough to give it that Cuban taste.

When the oil is hot enough, then throw in the bistecs.  If the oil is not hot enough, then the bistec will release water and it won’t dorar properly.  It will look more like a bisctec hervido than fried…and nothing grosses me out more than boiled bistec!

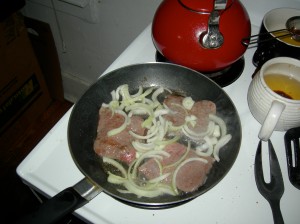
Back to the Bistec, fry for about 5 minutes on each side, you know so it gets a nice color.  Right before you are about to turn the bistec throw the onions in.  This will add enough juice without burning the onions.

Bistec with onions

Bistec with onions

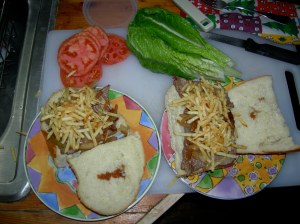
Once the bistecs are done, and the onions are a bit darker than honey then you are ready to start assembling this gift from God that is a Pan con Bistec.  No, I’m not exagerating!  Cut the bread to the size of sandwich you will want, and halve it horizontally.  The first step is to place the bistec on the bread.  Sometimes, depending on the mood, I put some papitas first and then the bistec.

Bistec

Bistec

Make sure you put those onions on top of the bistec as well!  Next we go for the papitas, so place those on top the bistec and onions.

Papitas!

Papitas!

Those papitas are HIGHLY addictive.  Alan never understood why I liked them so much until he learned just HOW MUCH I absolutely LOVE Pan con Bistec.  That said, make sure you keep some extra papitas to serve on the side.  Yes, they are messy to eat, but the combination of the salty papitas, with the onions and the bistec and its juices is just to. die. for.  No, I’m not kidding.

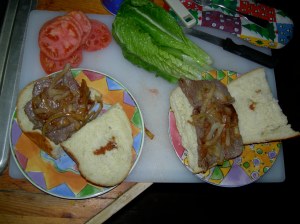
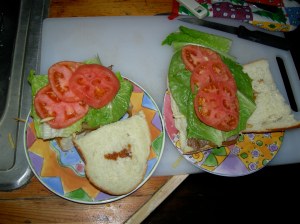
Now for the last step, place a couple of leaves of lettuce (Romaine or Iceberg, it’s really your preference) and two to three slices of tomatoes.  You can use big tomatoes or Roma tomatoes.  I like the big ones.  Oh and yes, I peel them before too.  Don’t worry you don’t have to; eating peeled tomatoes can become addictive as well.

BOPLT - Bistec, Onions, Papitas, Lettuce & Tomatoes (almost done!)

BOPLT - Bistec, Onions, Papitas, Lettuce & Tomatoes (almost done!)

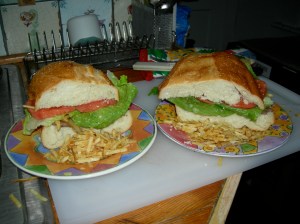
The next step, is the easiest – place the other bread half on top and ENJOY!  Before you bite into this wonderful Cuban concoction, they should look something like this:
Pan con Bistec!

Pan con Bistec!

Notice the papitas on the side!  Aside from mover el esqueleto Friday nights at La Covacha, this is one of the things I miss the MOST from my Miami years.  You can literally have this almost anywhere in South Florida and what’s even better at any time.  Hungry in the morning?  Pan con Bistec!  Want something for lunch? Pan con Bistec! Try something different for dinner? Pan con Bistec!  Late night munchies? Pan con Bistec!

Try this at home, it’s great for watching Football games, Baseball games, Soccer games….. well you get the picture.  It’s really GREAT even by itself!  Enjoy!

Creating My First Crockpot Recipe!

A while back I had asked Marta if she had ever used the crockpot for ablandar frijoles.  You see, while I can make MEAN frijoles negros, I am ashamed to say they come out of the can – the Goya con agua y sal can that is.  But everytime I’ve tried to make it out of dry beans, while the taste comes out great, they come out too runny for my taste.  I like frijoles negros to be espesos.

In any case Marta had said she used la olla de presión, you know the pressure cooker.  Me?  I’m deathly afraid of those things, even if now they are plug-in.  Too many stories about explosions.  Also, between you and me, I’m very jealous of how Marta comes up with these wonderful crockpot recipes so I’ve been secretly conspiring some of my own (like Marta, I want to be like Marta!).  I have a list (I swear I do) and as I am able to get the ingredients I’ll be turning my kitchen into a crockpot test kitchen!

Back to the frijoles negros. A couple of days ago I got a really strong craving for sopa de frijoles negros, which I haven’t had in uffffff a VERY long time (and they are a wonderful Lenten meal).   So I decided that would be the first recipe to try on the crockpot.  I’ll give you the recipe and at the end I’ll give you some modifications.

What you will need:

  • a pound of dry frijoles negros (one bag)
  • 5-6 cups of water
  • medium onion, chopped
  • 4 fat cloves of garlic minced
  • half a green pepper chopped
  • 1 tsp salt
  • 1/2 tsp of cumin
  • 1 tsp oregano
  • 3 bay leaves or 2 tsp of chopped bay leaves
  • one capful of white vinegar
  • one tablespoon of olive oil

Even though we do this on the crockpot, there is some pre-work to be done.  Soak the black beans in 5 cups of water  with the tsp of salt for 10 hours.  When ready, pour the beans with the water into the crockpot.  Add one to two more cups of water.  Chop your onion, green pepper and mince your garlic.

Sofrito

Sofrito

Heat the tablespoon of olive oil into a saucepan over medium heat.  Once the oil is hot enough, throw in the onions, peppers and garlic in that order.  Sauté for about 5 minutes, stirring.  Add the capful of vinegar, the oregano, and the bay leaves.  Stir for about 2 minutes, and take off the heat.

Sauteeing the Sofrito

Sauteeing the Sofrito

Add the sofrito to the frijoles in the crockpot.  Stir mixing well.  Add the cumin, stir again and cover.  Set on low for 8 hours.  However, without taking the lid off, check them around the 7th hour only to make sure they’ve got enough water.  I didn’t have a water problem at all.

Ready to turn on the crockpot

Ready to turn on the crockpot

Now, I usually like my sopa de frijoles negros a bit toned down from regular frijoles negros (you know, the ones you throw over rice)…and there is a reason for that.  Papi would always add about a tablespoon of chopped onion and a couple squirts of white vinegar to his frijoles negros. I never really understood why – until the first time I ate frijoles negros at a Cuban restaurant.  They tasted sort of off; I mean come on, compared to Abuela’s black beans they were tasteless!  And then I remembered, onions and vinegar…and voilá! The beans miraculously recuperated and were now delicious!  I kid you not, that’s how I eat the black beans at Pollo Tropical and everywhere else I go (I rarely like them just they way they are served).  I even got my husband hooked.

Why do I tell you all this?  Because that is how I serve the sopa de frijoles negros.  Since we are two, I do two servings – 2 tbsp of chopped onion and a cap of white vinegar. I place them in the individual custard pyrex molds and cover them with plastic wrapping and shake shake shake señora!  As for the rice, I use no more than half a cup of cooked valencia white rice for each serving.  I like to differentiate it from regular frijoles!  Place the onion first right in the center and the rice right over it so it looks something like this:

Sopa de Frijoles Negros!

Sopa de Frijoles Negros!

The soup came out great! However I discovered that this was a most EXCELLENT way to do regular frijoles negros.  Why?  They come out nice and thick!  So if you have a bunch of people to feed, or don’t mind eating frijoles negros for three days straight, here is what we need to modify the recipe for it to be stand alone frijoles.  I’ve yet to try it but I think the following amounts should do the trick:

  • Chopped onions (about a cup and a half to two cups)
  • One whole small to medium green pepper (half of what you use of the onion.  If you have the time and a gas stove, you SHOULD roast the green peppers before throwing them into the sofrito.  Trust me on this one.)
  • 8 fat garlic cloves
  • 1 to 2 tbsp of olive oil (as needed for the sofrito)
  • 2 caps of white wine vinegar
  • 4-6 medium bay leaves
  • 1 tsp of: salt, cumin (or you can modify to taste.  Note: you can omit the cumin, typically I don’t use it in my traditional frijoles negros but I included it here because many people do)
  • 2 tsp of oregano
  • IF you typically use sugar on your frijoles negros, then you can add it here too – but I have no idea what the amount would be.

Everything else in the methodology (OMG sounding too much like the graduate student that I am!) stays the same.  If you like frijoles negros, and you have a crockpot I invite you to try this recipe and make it your own.  Then you can come back and let us know how it came out!

Happy Cooking!

Adriana’s easy Frijoles Colorados

I love frijoles negros don’t get me wrong, but they are a staple in all Cuban restaurants.  Every day you go in the have frijoles negros or moros con cristianos.

So my heart skips a beat whenever I walk into a Cuban restaurant and find one of two things on the daily specials: Congrí Oriental or Potaje de Colorados.  We’ll concentrate on the latter otherwise known as Red Beans.

I prefer the small Red Beans to the Kidney beans only because of size, nothing else.  And oh yes, because due to the size I get to call them frijoles colorados instead of habichuelas and get away with it! 😉

One of my favorite kitchen memories is eating the chorizo slices out of the sofrito Mami was cooking.  Nothing better than sauteed chorizo español in olive oil…. Yummmmm!

Living in New England poses certain challenges when making frijoles colorados.  The first is that I cannot find a hueso de jamón.  At home in PR it was very easy, Papi owned a panadería and he would bring the bone from there.  See unlike in Miami, the panaderías in Puerto Rico slice with a knife the jamón and the pernil off the bone for the sandwich cubano and the medianoche.  When I first arrived in Miami, the fact that my jamón was machine-sliced and did not come from one of those jamones con hueso hanging from the ceiling was very dismaying.  Don’t know what I’m talking about?  Let me show you:

Jamones colgando del techo

Jamones colgando del techo

Now that’s what jamones look like!  So here, I have to buy that “smoked” ham with – if you are lucky – a tiny bone in the middle making sure it is not honey or maple or hickory flavored.  That is what I use for jamón de cocinar.  As for the bone, it depends.  If I find ham hocks, then I’ll use one per can.  If I don’t find them I have to make do without them.  Therefore this is the dire straits frijoles colorados made with what I can find in New England.

Yes, you read right: can.  This is easy frijoles remember?

The second challenge that I have not been able to overcome is calabaza.  Hard as I try, none of this squashes are the same.  I’ve tried Acorn squash (too hard) and Butternut squash (too soft).  Basically, I’ve given up on the calabaza factor. *sigh*

So what is a Cuban girl to do when she craves frijoles colorados?????  Improvise of course!  So here is my receta for quick and easy dire straits frijoles colorados that somewhat resemble real Cuban Red Beans.  Here is what you will need:

  • one can Goya Small Red Beans
  • one small Yellow onion
  • 1/4 green bell pepper (depends on size)
  • 1 bay leave
  • 4 cloves of garlic
  • half and Idaho potato dice to preference
  • half a small can of Hunts/Goya tomato sauce
  • cubed ham
  • sliced/ground chorizo español (as previously mentioned I use Portuguese Linguica which is a VERY good substitute)
  • Adobo sin pimienta
  • Olive oil

Ah yes, there is that no tomato again.  Here it is for a different reason.  Where I live, produce goes by seasons.  So in Winter tomatoes are very expensive and I don’t usually have them at home when the craving hits.  I use tomato sauce instead.

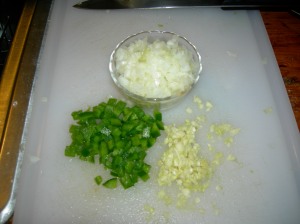
Start by chopping the onion and the green pepper, and mince the garlic.  Your ratio of onions to peppers should look something like this:

Onion, Peppers and Garlic

Onion, Peppers and Garlic

Those are flan (or custard) pyrex which I believe measure close to a cup.  Basically you need a ratio of 4:1 of chopped onion and chopped red green peppers.  I smash the garlic first (some people call it “bruising” – Hi Vivi!) and then mince it.  Once you have these ready, set aside.

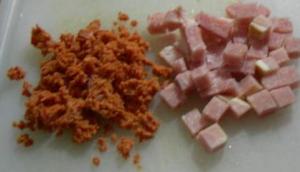
Next cube about a quarter of the ham steak and have the same amount of ground Linguica.  If you have access to chorizo español use two of the small ones sliced into quarter inch slices.

Ground Linguica and cubed ham

Ground Linguica and cubed ham

Heat over medium heat LESS than a tablespoon of EVO (extra virgin olive oil).  Add the ham and the chorizo/linguica stirring frequently.  As soon as the ham se dore and the chorizo/linguica starts oozing a bit of fat, then add in the following order the onion, peppers and garlic.  Stir and add some adobo and stir again.  Sofreir for about 3-5 minutes being careful that neither the onion nor the garlic gets burnt.  Add the tomato sauce, the bay leave and the potato.

Sofrito w/o tomato sauce

Sofrito w/o tomato sauce

Open the can of beans and pour into sofrito (including the water that comes with it).  Fill the empty can halfway with water, and with a spoon still to make sure there is nothing left in the can.  Pour into the cazuela too.  Keep it over medium heat and stirring occasionally until it starts to soft boil.

Frijoles starting to bubble

Frijoles starting to bubble

Once it starts bubbling, turn down the heat to simmer.  Stir once more and cover with aluminum foil and the lid so it creates a tight seal (I swear we Cubans must keep the aluminum foil paper business going singlehandedly!).

Let simmer for about 20 minutes and serve! (Hint: it goes over white rice and goes very well with pollo grillé!).  Now because there is no calabaza and I used canned small red beans, the color will be a bit redder than usual.  Don’t freak, this is normal; they still taste good and that is what matters.

Frijoles Colorados, White Rice and Pollo Grillé

Frijoles Colorados, White Rice and Pollo Grillé

¡Buen Provecho!

Adriana’s Moros con Cristianos or Arroz Congrí

Yet another cooking day in the Lambie-Bóveda household!  I promise once the Crismases are over, the cooking blogging will diminish and there will be more posts on us.  Besides, I’m starting to wonder if the neighbors think I’ve lost it since I know take pictures of everything I cook!

As I told you earlier, one of the things I love most about Christmas is that I get to cook Cuban food.  On Monday I went to a Christmas party and took what else?  Moros con Cristianos!

If you are Cuban, there is no Nochebuena nor New Year’s Eve without frijoles negros or Moros con Cristianos.  And since I will be away for New Year’s I wanted to make sure to leave you something!

Ask 5 Cuban women for the same recipe and I bet you that you will get 5 different recipes.  I call it the 5 Cubans Rule.  Provinces, families, regions, everyone does things differently.  So I would not be surprised to hear some of you cook Moros in a different way or even call them Arroz Congrí.

Believe it or not, I only learned how to make Moros last year (tsk, tsk).  Got the ingredients from the abuela of a friend whose family and him came over in el Mariel (Hi Leo!).  I love and dread making Moros, because it’s the kind of dish you perfect with practice…and I don’t make it often.

It’s been over 6 months since I last made it, so I am a bit weary of what the outcome will be.  Here is the recipe for Adriana’s Moros con Cristianos (Adriana’s Congrí for my PuertoRican readers!):

  • one cup of frijoles negros (pre-soaked)
  • 3 cups of the frijoles water
  • 3 cups of rice
  • bay leaves (3 to 5 depending on the size)
  • half a green bell pepper
  • one quarter red bell pepper
  • medium yellow onion
  • 8 garlic cloves (at least!)
  • jamón de cocinar (ham steaks preferably with the bone)
  • Spanish Chorizo (up here I use Portuguese Linguica)
  • Bacon (center cut works best)
  • Pork (either chops or boneless ribs)
  • Olive oil and a bit of manteca (pork manteca NOT crisco)
  • White vinegar
  • Salt, pepper, cumin and oregano to taste

I don’t usually measure my ingredients, I work a ojímetro (visually).  If you are familiar with the ingredients, and have eaten Moros before, then you can figure out the amounts.  What I’ve listed here is more a rule of thumb.  However, the ratio of beans to rice, and in particular of rice to water is non negotiable.

Some of you might say “hey, there is no tomato in there!”.  You are right.  NO TOMATOES.  In my household the only sofrito that never took tomatoes in any form, was the frijoles negros sofrito.  So it makes no sense in my house that Moros would take tomatoes.  Just the same I know some of you will balk at the chorizo in the Moros; remember 5 Cuban women, same dish, 5 different recipes.

Back to the Moros.  Soak the night before one cup of dry frijoles negros in about 5 cups of water.  No, you cannot cheat and used canned ones.  The color will be off. After 24 hours, simmer the frijoles in very low heat for about 20-30 minutes.  Note: the frijoles should be almost done but not quite, since they’ll finish off in the Moros.  If you soften them too much, they’ll disintegrate when you cook the rice.

Meat Sofrito

Meat Sofrito

I start the sofrito off with olive oil, cubed ham, ground chorizo, cubed pork and bacon.  This not only serves to cook the meat, but the fat from the chorizo and bacon will add great flavor!  Cook at medium low heat (enough to not burn, and enough to not produce any water) for about 5 to 10 minutes to make sure it releases all the fat.  If it starts to dry up add a bit of manteca.  At this point, I also add a bit of adobo sin pimienta.

moros-20001Once the cubed pork is somewhat cooked, add the onions, peppers, and garlic in that order to safeguard from burning the garlic.  Make sure to sofreir for a while (no more than 5 minutes) again at this medium low heat.  Add a bit of olive oil if necessary.  Here I add the cumin and the bay leaves so they can release the aroma and flavor into the sofrito, and then transfer it to the rice.
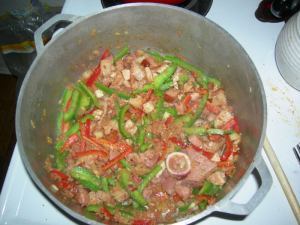
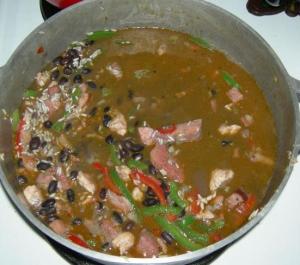
Sofrito

Sofrito

With the sofrito ready, add two caps of white vinegar (I think its about two teaspoons or one full tablespoon of white vinegar.  Make sure it is WHITE any other vinegar will completely change the taste of the Moros.

Sofrito with Rice

Sofrito with Rice

The sofrito will immediately release a pungent vinegar onion smell.  That is your cue to add the three cups of white rice and stir making sure to mix very well.  So that the rice does not burn or stick to the cazuela at this point (because you do want some raspa at the end!), add another bit of manteca (but careful you don’t want the Moros to be a greasefest!).

After a 2 or 3 minutes stir in the cup of frijoles negros.  Give it about 5 minutes carefully stirring and making sure nothing gets burnt.  This will allow the sofrito flavors to pentetrate the white rice and the frijoles.  Add in the 3 cups of the black water of the frijoles (this will give it the right color).  Stir well and wait for it to start softly bubbling.moros-50001As you stir and it starts to simmer, taste the caldito to make sure you are not short anything.  Here you will add a pinch of oregano and pepper, and anything else you think it still may need (maybe some more cumin, bay leaves, or a bit of salt).  Once it starts to bubble, cover tightly with foil and the lid of the cazuela.  Place the heat on its lowest available setting (usually Simmer/SM), and leave for about 20-25 minutes.

When the 25 minutes have passed, uncover completely.  With a fork (NEVER use a spoon, or the rice will come out pegao), fluff the rice from the bottom up.  Re-cover and leave another 10-15 minutes.  Apaga la ornilla, and let it sit for 5 more minutes.

Moros con Cristianos or Arroz Congri

Moros con Cristianos or Arroz Congrí

Uncover, fluff, serve……and of course ENJOY!!!!  BTW, it came out GREAT!

PS.  If by any chance you added too much water and it came out sticky, spread the Moros on a shallow but big Pyrex and place in the oven at 300 degrees for about 15 minutes.  This should finish it off.